Shopify is quickly becoming one of the top platforms for e-commerce website builders. It can easily integrate third-party apps for shipping, marketing, and payment processing. While it may not be quite as flexible as WordPress, it is a secure option that can you up and running in no time! As you continue to build upon your Shopify theme and dig into editing theme code via liquid files, it can become essential to utilize a third-party version control system such as Github.
What About The Shopify CLI?
The Shopify CLI is a command-line tool created by Shopify for developers who work on Shopify stores. It provides various functionalities, such as creating new themes, generating code scaffolds, edits to theme templates, managing local development environments, and deploying changes to Shopify stores. The Shopify CLI is specifically designed to streamline the development workflow for Shopify stores and provides features specific to the Shopify platform.
On the other hand, the GitHub CLI is a command-line tool created by GitHub for managing GitHub repositories from the command line. It allows you to perform various operations, such as creating and managing issues, pull requests, and releases, and managing branches and commits. GitHub CLI is a general-purpose tool that can be used with any GitHub repository, not just those related to Shopify development.
Both have their place in Shopify theme development but GitHub offers a few more benefits that we’ll explain before diving into how to Github.
4 Reasons Why You Should Connect Your Shopify Theme to Github
Version Control
GitHub provides version control, which allows you to track changes to your Shopify theme files over time. This makes it easy to roll back to a previous version of your theme if something goes wrong, and it also allows you to collaborate with other developers on your team more effectively.
Backups
By storing your theme files on GitHub, you also have a backup in case something happens to your local development environment or your online store. This can be especially useful if you make frequent changes to your theme files.
Collaboration
If you are working with a team of developers or designers on your Shopify store, GitHub can facilitate collaboration and communication by allowing team members to review, comment on, and suggest changes to the theme files.
Deployment
GitHub can also be used as a deployment tool, allowing you to automatically deploy changes to your Shopify store when you push changes to the repository. This can save time and reduce the risk of errors when deploying changes manually. Also, if you are building a site or making updates to a Shopify site and are utilizing a staging or development site and a local coding environment, deploying with GitHub is a breeze. Deploying can be done through command line tools or with the GitHub desktop client
12 Steps to Connecting Your Custom Shopify Theme To Github
- First, create a new GitHub repository for your Shopify theme. You can do this by logging in to your GitHub account, clicking on the “New” button in the top-left corner of the screen, and following the prompts to create a new repository.
- Next, you’ll need to clone the repository to your local machine. To do this, open up your terminal or command prompt and navigate to the directory where you want to store the repository. Then, use the following command to clone the repository:
git clone https://github.com/your-username/your-repository.git
Be sure to replace “your-username” and “your-repository” with the appropriate values for your own repository.
- Once the repository is cloned to your local machine, you can copy your Shopify theme files into the repository directory. This typically includes a combination of HTML, CSS, and JavaScript files.
- Once your theme files are in the repository directory, you can use the following commands to add, commit, and push your changes to GitHub:
git add .

git commit -m "Initial commit"

git push origin master
Be sure to replace “Initial commit” with a brief description of the changes you’re committing.
- To connect a branch to your Shopify theme, you first need to choose a branch. If your branch is over 50 MB, it can’t be connected. Here are the steps to connect your branch:
- Go to Online Store > Themes in your Shopify admin.
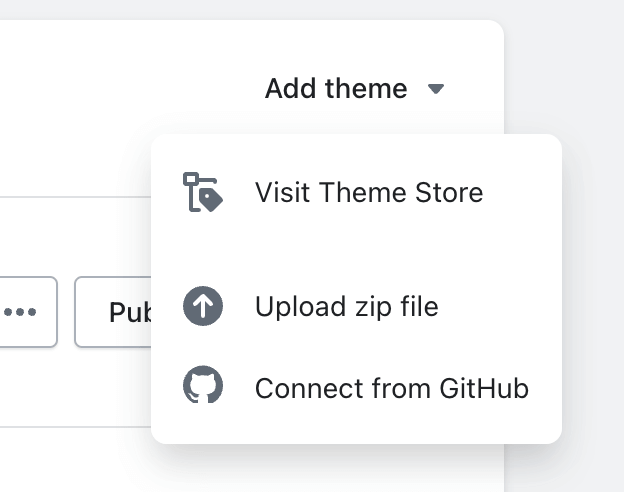
- Click on Add Theme > Connect from GitHub.
- If needed, sign in to your GitHub account.
- If you’re connecting to an organization’s repository, select the correct organization.
- Select the repository you want to connect to and choose the branch you want to use.
- Your theme will now appear in your theme library, showing the repository, branch name, and last commit time on the theme card.
- That’s it! Now you have successfully connected your branch to your Shopify theme.
By following these steps, you can connect your Shopify theme to GitHub and use version control to manage your theme files more effectively. For more in-depth information about the Shopify GitHub integration, you can view the official tutorial from Shopify.
We Can Help Customize Your Site
Are Shopify integrations getting too complex for you or are you reaching the end of your current Shopify theme customization knowledge? We can help! Set up a time to meet with our development team and let’s take your site to the next level.